Make Stuffed Animals Out of Drawings
Claudia has been writing about crafts online for many years. She is an avid crafter who has been creating for most of her life.
How to Make a Stuffed Toy From a Drawing
Glimmer Twin Fan
Turning a Doodle Into a Stuffed Animal or Plush Toy
My daughter is a doodler. She loves to draw little characters and give them to me as mementos. Over the years, I have accumulated quite a few and they are quite special to me.
As a quilter and I've often thought it would be fun to turn one of her doodles into a stuffed toy, so I decided to give it a try. It turned out to be a fun and simple project that anyone with some basic sewing skills can do.
Follow these step by step instructions, and you too can turn a drawing into a stuffed toy. You'll be amazed at the results.
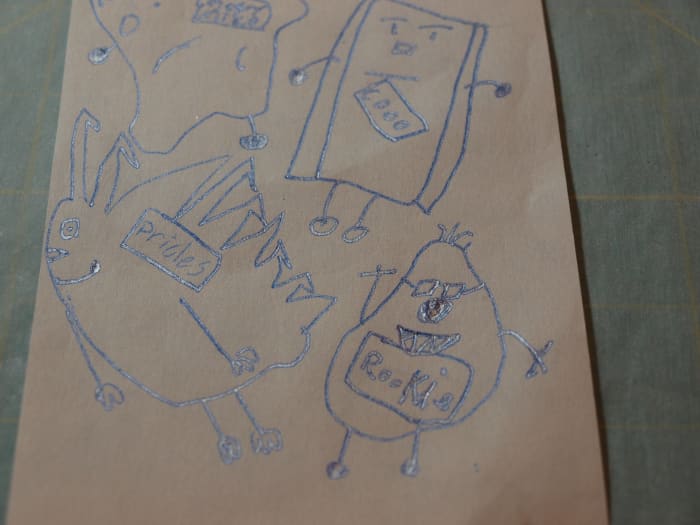
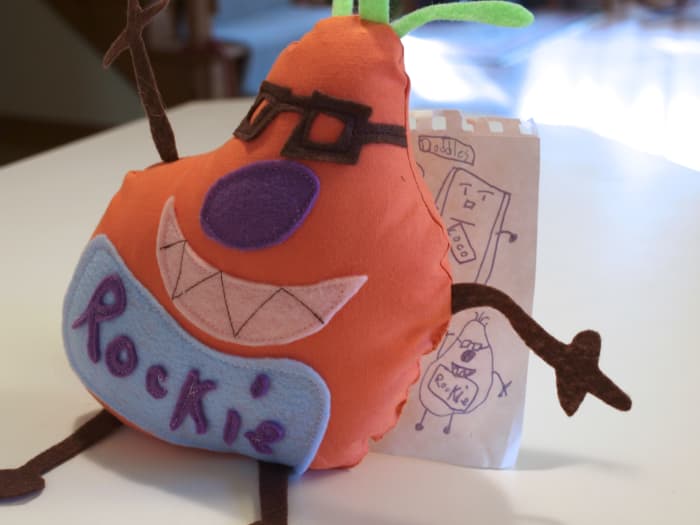
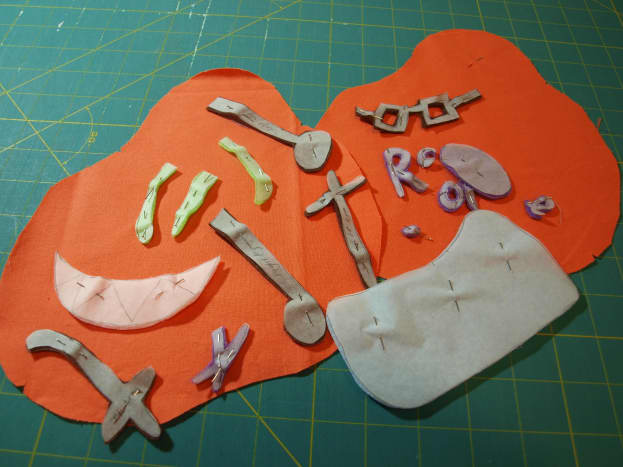
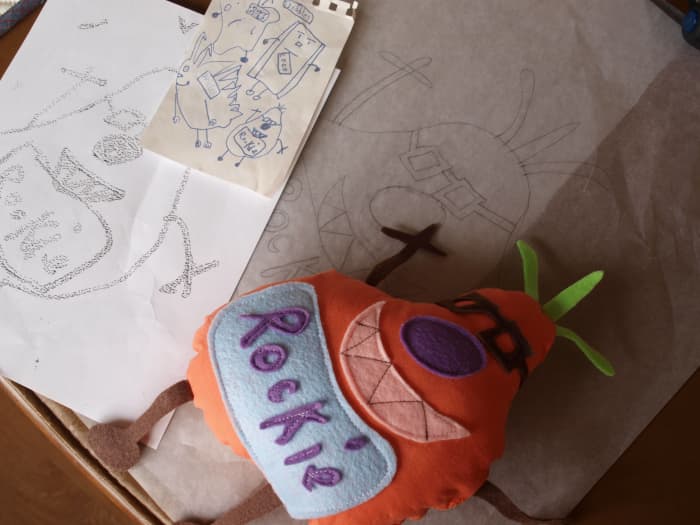
Pick out the doodle that you want to turn into a stuffed animal. I chose "Rockie" down in the lower right-hand corner.
Glimmer Twin Fan
Step 1 - Pick out a drawing
Whether it is large or small, black and white or full of color, choose the drawing you want for your stuffed toy. Use care as some drawings are going to be more difficult to put together than others. For example, "Pricles" on the bottom left of the photo, with all of his sharp points, would be difficult to do.
Tips:
- Choose a drawing that is relatively simple.
- Unless you are an expert seamstress, do not choose a doodle with lots of sharp edges and/or curves.
- Unless you like adding lots of embellishments, do not choose a doodle with lots of eyeballs, arms, hair and other things.
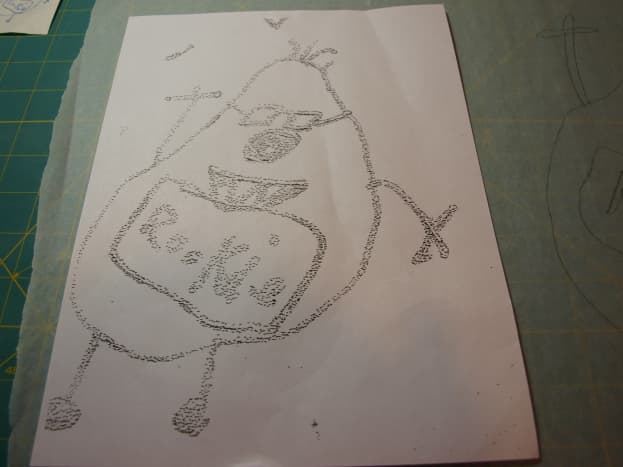


1. Using a copier, enlarge the drawing as much as possible. The original doodle is about 3 inches high.
Step 2 - Enlarge and trace the doodle
Chances are high that the original doodle is too small to make into a toy. That means you will have to enlarge the drawing.
- Use a copier and make the drawing as large as you would like it to be.
- Trace the large version of the drawing onto tracing paper. If you want the toy to be larger than the copier version, and as shown in the second photo above, make the tracing larger than the copier version. This takes a little time to get right, but it is worth it.
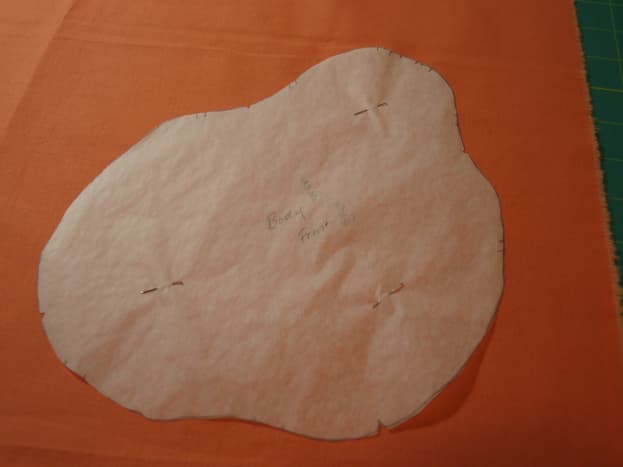
1. Part of the pattern pinned to fabric.
Step 3 - Create the pattern pieces and pin them to the fabric
- Using tracing paper, trace the individual pieces that will be made out of fabric. Do not cut out the pieces from the original tracing. You never know if you will need to retrace a piece.
- If needed, add some simple guidelines to help match up the body with other pieces. In the photo, the guidelines show where the felt hair will be placed.
- Label the pattern pieces.
- Pin all of the pattern pieces on the fabric(s) of your choice.
1. Cut out all of the individual pattern pieces.
Step 4 - Cut out the pattern pieces and pin them in place
- Cut all fabric pattern pieces out, using the tracings as your guide. Do not remove the paper pattern until you are ready to sew.
- With the exception of any legs, arms or other items that will be sticking out from the body, pin the pieces into place on the main body of the toy. Any pieces that will be sticking out of the body will be placed on later.
- Use your markings to help position items in the right place.
Read More From Feltmagnet
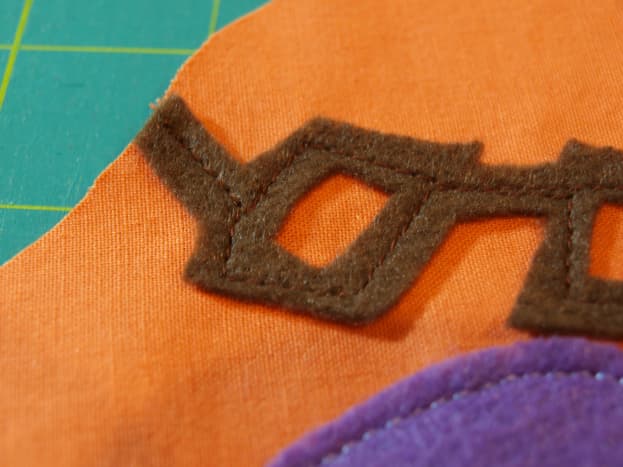
Sew pieces onto the front piece of the toy's body fabric.
Step 5 - Sew pieces onto body of toy
Fabric embellishments, like a nose or eyes, can be added by hand sewing them or by sewing them on with a machine. Sewing them on by machine will ensure that the toy is more durable and there is less of a chance that they will get torn or fall off.
With very few exceptions, remove the tracing paper pattern pieces before sewing. If you need guidelines, like the teeth in the photos above, sew through the pattern and then remove it.
Tracing paper can be removed fairly easily. Use care so the stitching does not pull out. If small paper pieces remain, use tweezers to remove them.
Tips :
- Use a different color thread to add definition or other interest to the toy.
- Always begin and end with 2 - 3 backstitches. This will help ensure that the sewing does not pull out.
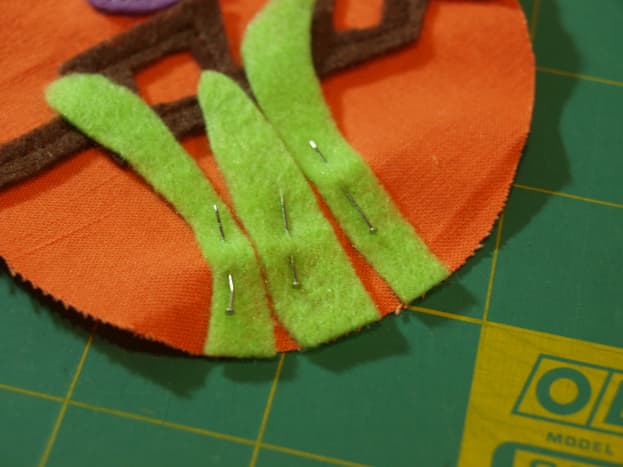


Add hair that will be sticking out of the top of the head.
Step 6 - Add external parts
Adding parts, like arms and legs, that will be sticking out of the body of the toy is handled differently than adding embellishments to the toy body.
For any part of the toy that is sticking out, it needs to pinned facing the inside of the body so that when the pieces are sewn together, they stick out when the toy is flipped inside out.
Using the hash marks you drew earlier, pin the pieces to the inside of the body as shown.
Tip: To make sure that they will be in the correct position when the sewing is done, test them by flipping them up.
Pin the pieces in place.

1. Pin the front of the body to the back, right sides together.
Step 7 - Sew the front of the toy body to the back
- With right sides together, pin the front to the back, using your markings as guides.
- Wherever there is a piece that will be sticking out, like a leg or hair, use mini pins to mark where it is.
- Determine where the opening for the stuffing will be.
- Sew the pattern together, using at least a 1/4" seam. Begin and end with back stitching. Whenever you come to a place where there is an extremity, back stitch for extra security.
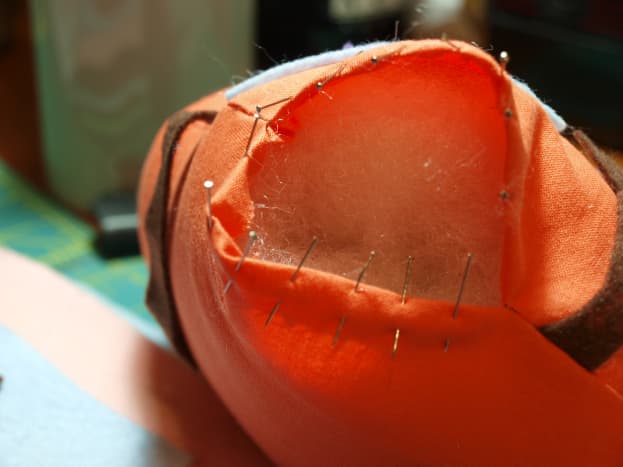
1. Flip the toy inside out. Note how the extremities are correctly placed.
Step 8 - Turn the toy inside out and then stuff
- Flip the toy inside out and lay flat.
- Using the stuffing of your choice, stuff the toy.
- Fill until you are happy with the look.
Tips:
- Before stuffing, run your finger around the inside seam to make sure it has been smoothed out.
- Use an adequate amount of stuffing. Too little and the toy will be floppy and lay flat. Too much and it will be extremely difficult to sew closed.
- Use the eraser end of a pencil to get stuffing into small nooks and crannies.
1. Using mini pins, fold the edges inward and pin to keep the folds in place.
Step 9 - Finish sewing the seam closed
To finish the seam follow these steps:
- Fold in the edges and pin, using small pins.
- Join the two sides together and pin, using larger pins. Don't use the pins sparingly. The more you use, the smoother the seam will be.
- Using a whip stitch and thread that blends with the fabric, sew together the two sides. Use a tight whip stitch so that no stuffing can come out.
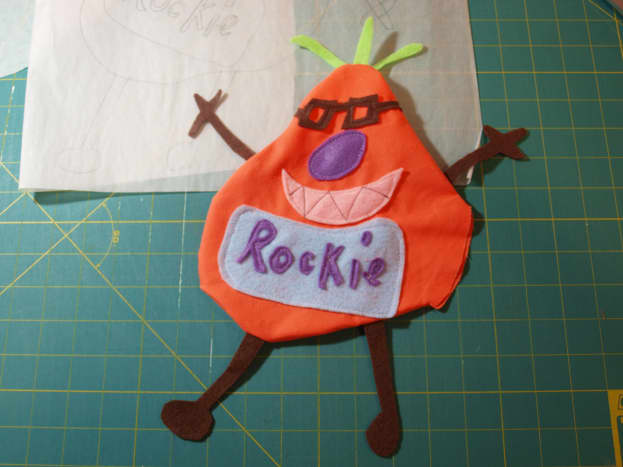
Step 10 - Here's Rockie!
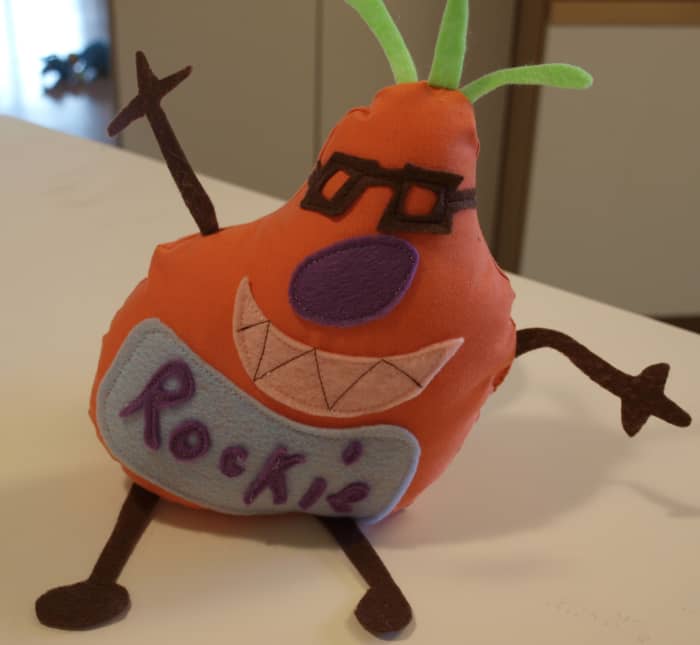
Here is the finished product!
Glimmer Twin Fan
Turn your child's drawing into a stuffed animal
There is something really special about making a stuffed toy out of a drawing. The result is a toy that no one else in the world has.
It is a lovely way to remember a favorite doodle that has been tucked away for years. It also makes a special, one-of-a-kind gift for friends or family.
Try making one of these wonderful toys. Your child or grandchild will be so happy and proud when they see one of their unique sketches turned into a stuffed toy.
From the original doodle to the stuffed toy
Glimmer Twin Fan
© 2013 Claudia Mitchell
Claudia Mitchell (author) on February 23, 2014:
Thanks Leki - I'll try that stitch next time.
Leki on February 21, 2014:
Can I just suggest one thing? Use a ladder stitch rather than a whip stitch for a cleaner edge that holds great. Almost all plush makers that I know use this stitch (myself included) :)
mariamvs714 on July 24, 2013:
This is an amazing tutorial. Excellent photos and explanations. Thank you so very much for sharing it.
Claudia Mitchell (author) on April 21, 2013:
Thanks so much Nell! I appreciate the support. It is such a fun project to do.
Nell Rose from England on April 18, 2013:
Hi Glimmer, loved this! really clever idea, great to see you back, and voted up and shared! lol!
Claudia Mitchell (author) on February 08, 2013:
Thanks so much kittycriston. I'm glad you enjoyed it.
Kitty Criston on February 07, 2013:
wow.. i like it. This hub is very creative.
It is very nice. :)
Claudia Mitchell (author) on February 06, 2013:
I appreciate it moonlake. I don't know how old your kids are, but if you have an old drawing tucked away, you could surprise them. I'm glad you enjoyed the hub.
moonlake from America on February 06, 2013:
Congrats on HOTD! I love this wish I had thought of it when my kids were little.. Great information voted up and more.
Claudia Mitchell (author) on February 06, 2013:
Thank you so much Au Fait! Wow - I'm impressed you can sew all those clothing items. I can't sew clothes at all, but wish I could. I hope you give this a try too! I appreciate all of the support.
Claudia Mitchell (author) on February 06, 2013:
michyoung - Glad you enjoyed the hub. I hope your toy turns out nicely! Have fun making it.
C E Clark from North Texas on February 05, 2013:
Forgot to say, Voted up, awesome, and will share! ;)
C E Clark from North Texas on February 05, 2013:
What a cute original idea! I've been hand sewing and embroidering since I was about 5 years old -- making doll clothes out of scraps. I learned to sew with a sewing machine when I was 14 and made most of my own school clothes after that, prom dresses, etc. I still sew now and then, but usually decorative things for gifts, etc. I think this idea you have is fabulous! And sew easy, too!
Congratulations on getting Hub of the Day!!
michyoung from North Carolina, USA on February 05, 2013:
that's creative and cute! :D I'll try that at home :D
Claudia Mitchell (author) on February 05, 2013:
Thanks so much Sally's Trove. I appreciate all of the support. I might have to think about the etsy thing. I'm not so familiar with it. Thanks for the encouragement!
Stephanie Bradberry from New Jersey on February 05, 2013:
Thanks for getting back to me so quick. I learned my lesson about back stitching a while ago. I will never make the mistake of not securing my work again.
Sherri from Southeastern Pennsylvania on February 05, 2013:
What a wonderfully creative idea. I'm with ComfortB about selling on etsy. I think lots of folks would want to send their kids' drawings in to have a one-of-a-kind stuffed animal made by hand (what a beautiful gift to honor a child). Up, interesting, useful, and all that jazz!
Claudia Mitchell (author) on February 05, 2013:
I really appreciate your kind comments travel_man1971. I'm glad you liked the hub.
Claudia Mitchell (author) on February 05, 2013:
Thanks so much Rkwebs! I appreciate it.
Claudia Mitchell (author) on February 05, 2013:
Thank you for your kind comments anuramkumar. I'm glad you enjoyed the hub.
Claudia Mitchell (author) on February 05, 2013:
I appreciate it Thelma. My daughter is so excited reading all of these comments. Thanks.
Claudia Mitchell (author) on February 05, 2013:
Thanks so much ComfortB! I have never thought about selling on Etsy, but maybe I will.
Ireno Alcala from Bicol, Philippines on February 04, 2013:
HOTD Lady, congrats! You're such a creative hubber. You deserve to be featured here. :)
Rajnesh kumar from India on February 04, 2013:
sweet and awesome creativity
anuramkumar from Chennai, India on February 04, 2013:
Congrats for the HOTD! You have explained very clearly on how to make a stuffed animal. Excellent work!
Thelma Alberts from Germany on February 04, 2013:
Congratulation on winning the HOTD! A very well deserved award. Very creative and this is one of the unique stuffed toy I have seen online. Thanks for sharing.
Comfort Babatola from Bonaire, GA, USA on February 04, 2013:
Love this. It reminds me of Humpty dumpty. Do you sell on etsy? If not, maybe you should.
Congrats on your HOTD!
Claudia Mitchell (author) on February 04, 2013:
Wakerra - It is priceless to get the reaction from the recipient. How can you beat a one of a kind toy. Thanks for the comments.
Claudia Mitchell (author) on February 04, 2013:
I appreciate it twig22bend! Let me know how yours turns out.
Claudia Mitchell (author) on February 04, 2013:
Hi StephanieBCrosby - I appreciate the comments and support. I used a simple straight stitch, but made it tighter. Also, I always back stitched to secure things.
Claudia Mitchell (author) on February 04, 2013:
Thanks for such nice comments Olde Cashmere. I bet your nephew would love one of these as a gift.
Claudia Mitchell (author) on February 04, 2013:
Thanks so much Bill!
Claudia Mitchell (author) on February 04, 2013:
Thanks Pinkchic18! I'm glad you enjoyed the hub.
Claudia Mitchell (author) on February 04, 2013:
Thanks so much vespawoolf! This was a really fun hub to do. I appreciate your comments.
Wakerra on February 04, 2013:
My friend has a character that's a doll. For Christmas a couple years back I hooked up with another friend and we made a doll of her character. Unlike "Rockie" here, it wasn't a simple design, but just as fun to make. And the reaction we got when we presented it was priceless
twig22bend on February 04, 2013:
What a clever idea. I will try this soon . Thanks for sharing. Congratulations on your HOTD.
Stephanie Bradberry from New Jersey on February 04, 2013:
Well, we know why you got awarded a Hub of the Day. This tutorial is useful, awesome, beautiful, and interesting. I would really like to try my hand at toys.
Do you recommend a certain type of stitch or just a straight stitch to keep everything together?
Olde Cashmere on February 04, 2013:
This is so creative and exciting because I have a nephew who loves to create unique characters. Voting this up and rating useful, awesome, and interesting. I can see why this was hub of the day. Outstanding article :)
Bill Holland from Olympia, WA on February 04, 2013:
Congratulations on your HOTD! I'm happy for you!
Sarah Carlsley from Minnesota on February 04, 2013:
This is awesome! What a creative idea!
Vespa Woolf from Peru, South America on February 04, 2013:
Congrats on HOTD! What a cute idea and I'm sure your daughter is thrilled with the stuffed representations of her drawings. I really like the step-by-step instructions with photos. I hope to use this someday!
Claudia Mitchell (author) on February 04, 2013:
Many thanks Dreamer Meg. I'm glad you enjoyed it.
Claudia Mitchell (author) on February 04, 2013:
Mary - Thanks so much for the support! I love the tshirt throw pillow idea. I have kept her special tshirts and my have to do something like that.
Claudia Mitchell (author) on February 04, 2013:
savingkathy - My daughter did get a big kick out of it. It's so much fun doing something that our kids will appreciate. Thanks for commenting.
Claudia Mitchell (author) on February 04, 2013:
I'm glad you enjoyed the hub Purple Perl. Thanks for commenting.
Claudia Mitchell (author) on February 04, 2013:
Hi Suzie HQ - Thanks for your kind comments. You should make one from one of your doodles! It would be lots of fun. I appreciate all of your support.
Claudia Mitchell (author) on February 04, 2013:
I appreciate it Happyboomernurse! "Rockie" was a lot of fun to make and my daughter loves him.
Claudia Mitchell (author) on February 04, 2013:
Thanks so much ThePracticalMommy! I appreciate it.
Claudia Mitchell (author) on February 04, 2013:
I hope you give it a try NCBler and I'm glad you enjoyed the hub. Thanks for reading!
DreamerMeg from Northern Ireland on February 04, 2013:
Fantastic idea!
Mary Hyatt from Florida on February 04, 2013:
Congrats on HOTD. Well deserving! I used to take my kid's old T shirts and make throw pillows that they could keep. I love this idea!
Voted it UP, and will share.
Kathy Sima from Ontario, Canada on February 04, 2013:
What a neat idea - and such a special treat for your daughter to see one of her creations brought to life!
Congratulations on the HOTD!
Esther Shamsunder from Bangalore,India on February 04, 2013:
What a creative mom you are! Using your talent in fun ways makes your life more interesting. So, voted you up and interesting!
Suzanne Ridgeway from Dublin, Ireland on February 04, 2013:
Hi GTF,
WOW, how brilliant you are! I love your creativity here taking a doodle and turning into Rockie!! Your daughter must have been thrilled at how clever her mom is. This is an excellent step by step with great detail, I definitely would think of using and I was always a doodler, still am!! LOL
Much deserved HOTD!!
VU, ++++, shared and pinned!!
Gail Sobotkin from South Carolina on February 04, 2013:
Congrats on earning HOTD for this great and oh so creative craft idea!
"Rockie" is adorable, and since your daughter, created him out of her imagination, it makes the stuffed toy an absolutely wonderful keepsake for future years.
Voted up across the board except for funny.
Marissa from United States on February 04, 2013:
Just coming back to say congrats on the HOTD! This hub deserved it!
NCBIer on February 04, 2013:
Awesome! You have made it look so easy that I have to give it a try. I love twoseven's idea of collecting them through the year and making a truly unique Christmas gift. Thanks so much for the hub!
Claudia Mitchell (author) on February 04, 2013:
Jill - I really appreciate at the support! Thanks.
Claudia Mitchell (author) on February 04, 2013:
Thanks for the comments kingkos. People could do this with all sorts of characters.
Claudia Mitchell (author) on February 04, 2013:
Hi Ktrapp - This could definitely be adapted to puppets and made out of any fabric. Also makes a great surprise gift for someone older...take one of their past drawings that has been saved and then see if they remember it. I'm glad you enjoyed the hub. Thanks for commenting.
Claudia Mitchell (author) on February 04, 2013:
Thanks so much purl3agony. I appreciate it.
Claudia Mitchell (author) on February 04, 2013:
Pstraubie - I always love your comments and I am glad you enjoyed the hub. Thanks!
Claudia Mitchell (author) on February 04, 2013:
Thank you so much for your nice comments kittycriston.
Claudia Mitchell (author) on February 04, 2013:
Hi RTalloni - I appreciate the support and comments. It's so much fun to see the results when a toy like this is done.
Claudia Mitchell (author) on February 04, 2013:
Thanks so much Mitch! I thought about letting some of my friends know I could do this. It would be nice way to make a little extra money. I appreciate the comments.
Jill Spencer from United States on February 04, 2013:
Congratulations on another well-deserved HOTD. Woo-hoo!!!
kingkos on February 04, 2013:
One of the best creative hub I see, Maybe you can make some anime stuffted like naruto and onepiece. And most who will comment here are women who loves that. Great hub!
Kristin Trapp from Illinois on February 04, 2013:
What an absolutely clever idea and a fantastic way to encourage a child's artistic skills. If there's a "story" going on with the characters in the doodles, it might be fun to make them into felt puppets too. My daughter used to always put on plays with puppets when she was little. Great, unique Hub and craft idea - congratulations on getting HoTD.
Donna Herron from USA on February 04, 2013:
So cute! I love this idea. Congrats on your HOTD!!
Patricia Scott from North Central Florida on February 04, 2013:
You are so creative, Glimmer. What a gift you have. Congratulations on hub of the day...have a lovely Monday .
Sending you many Angels early this morning from my house to yours. :) ps
Kitty Criston on February 04, 2013:
Congratulation! really very interesting hub! keep up :)
RTalloni on February 04, 2013:
Congrats for your Hub of the Day on this great tutorial. Making a child's drawing into a 3D toy is a fabulous memory maker! Pinned to Arts and Crafts board.
Mitch Turnure from South Jersey on February 04, 2013:
Very cool hub...I see a home-based business for a talented seamstress...custom doodle dolls made from your kiddos doodles...keep hubbing...
Claudia Mitchell (author) on February 01, 2013:
Thanks so much Rajan. I appreciate all of the support.
Claudia Mitchell (author) on February 01, 2013:
I appreciate it Faith! It really is easy, just takes a little time and planning.
Rajan Singh Jolly from From Mumbai, presently in Jalandhar, INDIA. on January 31, 2013:
This is just brilliant GTF. The pictures though make it seem so easy but it is indeed an amazing job.
Voted up and awesome and pinned.
Faith A Mullen on January 31, 2013:
SO cute! And it looks pretty easy! Awesome hub. Voted up :)
Claudia Mitchell (author) on January 31, 2013:
Thanks so much Sunshine! It was a fun one to do.
Claudia Mitchell (author) on January 31, 2013:
Thanks so much Jeannieinabottle! The nice thing is this is easy sewing. Many thanks for the comments.
Linda Bilyeu from Orlando, FL on January 31, 2013:
I saw something similar on Pinterest a few weeks ago, but they didn't supply step by step directions. Well done!
Jeannie Marie from Baltimore, MD on January 31, 2013:
This is so cute! I am not great at sewing things, but what a great idea for someone that does have talent, like yourself. Voted up!
Claudia Mitchell (author) on January 31, 2013:
Thanks so much Leah! It really is a fun project and my daughter has "Rockie" proudly displayed on her shelf. I hope they enjoy the project.
Leah Lefler from Western New York on January 31, 2013:
Oh my goodness, this is really cool! My boys would LOVE this! I could do this as a wonderful project over the summer- the boys could do the drawing, the measuring, etc. and learn from it - and I'd do the sewing. Great hub! Pinning this one!
Claudia Mitchell (author) on January 29, 2013:
Hi DDE - I'm glad you enjoyed the hub. It was fun to do. Thanks for commenting.
Devika Primić from Dubrovnik, Croatia on January 29, 2013:
What a lovely idea and so creatively thought of, a well presented hub. Voted up!
Claudia Mitchell (author) on January 28, 2013:
Thanks so much Neinahpets! I hope you get a chance to do this. It is so much fun for anyone.
Stephanie from Canada on January 27, 2013:
Oh my this is so cute! I would really love to do this myself and have always thought sewing things to be a hard thing to learn. This is a pretty neat tutorial on how to create a stuffed toy from drawings; and as an artist, I can appreciate that! Voted up!
Claudia Mitchell (author) on January 24, 2013:
Thanks Jackie - You could do this for anyone. It's fun and makes a great gift for a parent or grandparent. Have a great day.
Claudia Mitchell (author) on January 24, 2013:
Thanks so much shiningirisheyes! What a nice comment. It was a really fun project to do and I'm glad she still gives me doodles to work with.
Jackie Lynnley from the beautiful south on January 23, 2013:
I love this. Makes me wish I had kids to enjoy it with!
Shining Irish Eyes from Upstate, New York on January 23, 2013:
Not only is this stupendous, it reflects the love and admiration you carry for your child. You not only cherished her drawings, you brought them to life.
Outstanding What a great Mom!
Kathryn from Windsor, Connecticut on January 19, 2013:
I still have a picture my brother drew for me when he was 10 years old. It would be a cool project to test on that drawing.
Claudia Mitchell (author) on January 19, 2013:
Thanks so much for visiting my hubs Kathryn! You could do this with one of your drawing too, or for a friend.
Kathryn from Windsor, Connecticut on January 18, 2013:
That is a cute and creative idea! I'll have to keep that in mind when I have kids.
Claudia Mitchell (author) on January 18, 2013:
Wow - 10 soon to be 12...this project will definitely be keeping you busy for a while. I'm glad you enjoyed the hub. This was definitely a fun one to write and I hope lots of kids will enjoy these toys. Thanks so much for reading!
Suzie from Carson City on January 17, 2013:
Glimmer...This is GREAT! Thanks for the "useful" at-home project for Grandma's rainy days. I love sitting in my sewing room, doing something productive. With 10....soon to be 12 ,grandchildren....can I have a ball with this?.....oh yeah!......UP+++
Claudia Mitchell (author) on January 17, 2013:
Thanks so much twoseven! Your son will be proud to give his grandparents toys from his drawings. Have fun!
twoseven from Madison, Wisconsin on January 16, 2013:
What a wonderful and unique idea! I am going to save my son's sketches all year and make them into Xmas presents next winter! The grandparents will be thrilled.
Claudia Mitchell (author) on January 16, 2013:
Thanks so much GiblinGirl. It really is fun.
GiblinGirl from New Jersey on January 16, 2013:
This actually sounds like a fun project and it seems pretty doable!
Make Stuffed Animals Out of Drawings
Source: https://feltmagnet.com/textiles-sewing/How-to-Make-a-Stuffed-Animal-From-a-Drawing
0 Response to "Make Stuffed Animals Out of Drawings"
Post a Comment